Code & Automation
Building A 3 Tier Clos Network Generator In Python Using NetworkX And Jinja2
What is a Clos network? A Clos network (also known as a Spine-Leaf) is a type of non-blocking switching network that was invented by Edson Erwin in 1938 and first formalised by Charles Clos in 1952. As computer networks have evolved over the years Clos networks have become a popular design for datacenter fabrics, allowing huge amounts
What is a Clos network?
A Clos network (also known as a Spine-Leaf) is a type of non-blocking switching network that was invented by Edson Erwin in 1938 and first formalised by Charles Clos in 1952. As computer networks have evolved over the years Clos networks have become a popular design for datacenter fabrics, allowing huge amounts of bandwidth to be shared by sets of clients, employing the principal that typically the number of ports available for interconnecting clients north and south of a Clos are symmetrical. Clos networks are tiered and can be deployed with a variety of tiers, such as 3-tier or 5-tier, as the number of tiers increases so does the available bandwidth and cost of implementation.
More information on Clos networks can be found here.
Building the generator
Link to the full project: https://git.macf.dev/macf/ClosX
Let’s break this down into sections – we’ll need distinct functions each responsible for performing a specific action, along with a class to house these functions and key attributes of the Clos itself.
These functions will:
- Break up an IP range into /32 management IPs
- Break up an IP range into /31 point-to-point subnets
- Build the Clos (populate the networkx Graph object with nodes, node attributes, edges and edge attributes, draw the topology and kick off configuration rendering)
- Render device configuration (a simple OSPF topology using 1G links)
- Create a mapping of available and used port indexes for use in configuration rendering
Libraries
We’ll use the following libraries for this project:
- argparse
- networkx
- ipaddress
- yaml
- sys
- jinja2
import argparse
import networkx as nx
import ipaddress
import yaml
import sys

from networkx.drawing.nx_agraph import to_agraph
from jinja2 import Environment, FileSystemLoader
Classes, functions and miscellaneous
Class: Clos
The Clos class will contain key attributes of the Clos such as:
- NetworkX graph object
- Nodes (also knows as devices – dictionary of lists, keyed by node type)
- Edges (also known as links – list of edge tuples)
- Spine size (Size of spine as string)
- Tier2 size (Size of tier2 as string)
- Tier1 size (Size of tier1 as string)
- IP range for point-to-point links (IP range to split into /31 subnets as string)
- IP range for management (IP range to split into /32 management IPs as string)
- Total number of nodes (Sum of spine size, tier2 size, tier1 size as integers)
- Vendor (Vendor name as string)
- NetworkX graph image name (string)
These attributes will create the basis of the Clos, allowing the functions mentioned earlier to utilise them as inputs and produce the desired outcome – a full Juniper or Cisco configuration file for every device within the Clos.
Code
class Clos():
    def __init__(self, spine_size, tier2_size, tier1_size, ip_range, mgmt_range, vendor):
        '''
            Summary:
            Takes a router list and builds a vars_dict to pass to the associated Jinja template.

            Assigns:
            self.G: Networkx graph object
            self.nodes: Dict of lists, keyed by node type, dict example:
            {
                'spine_list': ['s1-r1', 's1-r2', 's1-r3', 's1-r4', 's1-r5', 's1-r6', 's1-r7', 's1-r8'],
                'tier2_list': ['t2-r1', 't2-r2', 't2-r3', 't2-r4', 't2-r5', 't2-r6', 't2-r7', 't2-r8', 't2-r9', 't2-r10', 't2-r11', 't2-r12', 't2-r13', 't2-r14', 't2-r15', 't2-r16'],
                'tier1_list': ['t1-r1', 't1-r2', 't1-r3', 't1-r4', 't1-r5', 't1-r6', 't1-r7', 't1-r8', 't1-r9', 't1-r10', 't1-r11', 't1-r12', 't1-r13', 't1-r14', 't1-r15', 't1-r16']
            }
            self.edges: List of edge tuples, list example:
            [
                ('s1-r1', 't2-r1'),
                ('s1-r1', 't2-r2'),
                ('s1-r1', 't2-r3'),
                ('s1-r1', 't2-r4'),
                ('s1-r1', 't2-r5'),
                ('s1-r1', 't2-r6'),
                ...etc
            ]
            self.spine_size: Size of spine as str, always converted to int
            self.tier2_size: Size of tier2 as str, always converted to int
            self.tier1_size: Size of tier1 as str, always converted to int
            self.ip_range: IP range to split into /31 subnets as str, always converted to ipnetwork object
            self.mgmt_range: IP range to split into /32 management IPs as str, always converted to ipnetwork object
            self.total_nodes: Sum of spine_size, tier2_size and tier1_size as int
            self.vendor: Vendor template to use for rendering as str
            self.image_name: Name of the networkx graph object visualisation file as str
        '''
        self.G = nx.Graph()
        self.nodes = {}
        self.edges = []
        self.spine_size = spine_size
        self.tier2_size = tier2_size
        self.tier1_size = tier1_size
        self.ip_range = ip_range
        self.mgmt_range = mgmt_range
        self.total_nodes = int(spine_size) + int(tier2_size) + int(tier1_size)
        self.vendor = vendor
        self.image_name = 'clos.png'

Functions here...
Function: get_mgmt_ips
The get_mgmt_ips function will take an IP range and break it up into /32 management IPs, for example 10.0.0.0/24 would turn into 10.0.0.1/32, 10.0.0.2/32, 10.0.0.3/32 etc.
If the number of total nodes is larger than the amount of management IP addresses then the management subnet provided by the user is not sufficiently sized, causing the code to exit with a message informing the user of this, and displaying the total number of nodes and management IP addresses.
Code
def get_mgmt_ips(self):
        '''
            Summary:
            Takes an IP range and splits it into /32 management IPs.
            Exits if the number of nodes exceeds the number of /32 management IPs, prompts user to provide a bigger IP range.

            Takes:
            self: Clos object

            Returns:
            mgmt_ips: List of /32 management IPs
        '''
        ips = ipaddress.ip_network(self.mgmt_range)
        mgmt_ips = list(ips.subnets(new_prefix=32))

        if self.total_nodes > len(mgmt_ips):
            sys.exit(f'Insufficient IP space for allocating required amount of /32s. Nodes: {len(self.total_nodes)}, /32s: {len(mgmt_ips)}, provide a bigger mgmt IP range')

        return mgmt_ips
Function: get_p2p_ips
The get_p2p_ips function is very similar to the get_mgmt_ips function, taking an IP range and breaking it up into /31 point-to-point IPs, for example 192.168.1.0/24 would turn into 192.168.168.1.0/31, 192.168.1.2/31, 192.168.1.4/31 etc.
If the number of total edges is larger than the amount of point-to-point IP subnets then the p2p subnet provided by the user is not sufficiently sized, causing the code to exit with a message informing the user of this, and displaying the total number of edges and p2p subnets.
Code
def get_p2p_ips(self):
    '''
        Summary:
        Takes an IP range and splits it into /31 subnets.
        Exits if the number of edges exceeds the number of /31 subnets, prompts user to provide a bigger IP range.

        Takes:
        self: Clos object

        Returns:
        p2p_ips: List of /31 subnets
    '''
    ips = ipaddress.ip_network(self.ip_range)
    p2p_ips = list(ips.subnets(new_prefix=31))

    if len(self.edges) > len(p2p_ips):
        sys.exit(f'Insufficient IP space for allocating required amount of /31s. Edges: {len(self.edges)}, /31s: {len(p2p_ips)}, provide a bigger IP range')

    return p2p_ips
Function: get_port_indexes
The get_port_indexes function is arguably the most complicated and important part of the generator, in order to keep port assignments uniform and ensure they don’t overlap between spine, t2 and t1 devices, we need to keep track of which port indexes have been allocated, and which port indexes are available to allocate.
To do this we create a dictionary keyed by the node name, and then inside that create another dictionary with 2 keys, value pairs: uplinks and downlinks, each having a list value – uplink values range from 0 to 23, downlink values range from 24 to 47. This assumes that 48 port devices will be used to build the Clos network.
The function first checks that the number of spine, t2 and t1 devices are under 24 to ensure that port allocations will be able to sufficiently interconnect the tiers and then creates two blank dictionaries, allocated_port_indexes and free_port_indexes.
Next the free_port_indexes dictionary is populated as mentioned above:
{
    'node_name': {
        'uplinks': [0, 1, 2, 3, 4, 5, 6, 7, 8, 9, 10, 11, 12, 13, 14, 15, 16, 17, 18, 19, 20, 21, 22, 23],
        'downlinks': [24, 25, 26, 27, 28, 29, 30, 31, 32, 33, 34, 35, 36, 37, 38, 39, 40, 41, 42, 43, 44, 45, 46, 47]
    }
}
Once populated we begin allocating port indexes starting from edge_index 0 so that we can keep track of which port indexes relate to which edge. We iterate over all edges in the edges list (populated by the build function) and assign:
lowest_available_downlink– lowest integer infree_port_indexesdownlinks for the first node in the edgelowest_available_uplink– lowest integer infree_port_indexesuplinks for the second node in the edge
We then update the allocated_port_indexes dictionary with the edge_index, a_end_index and b_end_index before removing the allocated port indexes from the free_port_indexes dictionary.
Once done for all edge indexes, the allocated_port_indexes dictionary will look like so:
{
    0: {'a_end_index': 24, 'b_end_index': 0},
    1: {'a_end_index': 25, 'b_end_index': 0},
    2: {'a_end_index': 26, 'b_end_index': 0},
    3: {'a_end_index': 27, 'b_end_index': 0},
    ...etc
}
Code
def get_port_indexes(self):
    '''
        Summary:
        Calculates port indexes for both sides of edges in the networkx graph object. The lowest available index is always used.
        Once used, port indexes are removed from the free_port_indexes uplinks or downlinks list.
        Design principles of a Clos network define that port radix should be equal north and south.
        Max amount of uplink or downlink ports is 24.
        Exits if the number of port indexes required exceed the max, prompts user to reduce spine, tier2 or tier1 size.

        free_port_indexes dict example:
        {
            's1-r1': {
            'uplinks': [0, 1, 2, 3, 4, 5, 6, 7, 8, 9, 10, 11, 12, 13, 14, 15, 16, 17, 18, 19, 20, 21, 22, 23],
            'downlinks': [24, 25, 26, 27, 28, 29, 30, 31, 32, 33, 34, 35, 36, 37, 38, 39, 40, 41, 42, 43, 44, 45, 46, 47]
            }
        }

        Takes:
        self: Clos object

        Returns:
        allocated_port_indexes: Dict of dicts, keyed by edge index, containing assigned a and b end indexes.

        allocated_port_indexes dict example:
        {
            0: {'a_end_index': 24, 'b_end_index': 0},
            1: {'a_end_index': 25, 'b_end_index': 0},
            2: {'a_end_index': 26, 'b_end_index': 0},
            3: {'a_end_index': 27, 'b_end_index': 0},
            ...etc
        }
    '''
    if int(self.spine_size) > 24 or int(self.tier2_size) > 24 or int(self.tier1_size) > 24:
        sys.exit('Amount of required port indexes exceeds free port indexes, decrease the size of spine/tier2/tier1 if they exceed 24')

    allocated_port_indexes = {}
    free_port_indexes = {}

    for node in self.G.nodes:
        free_port_indexes.update({node: {'uplinks': [i for i in range(0, 24)], 'downlinks': [i for i in range(24, 48)]}})

    edge_index = 0
    for edge in self.edges:
        lowest_available_downlink = min(free_port_indexes[edge[0]]['downlinks'])
        lowest_available_uplink = min(free_port_indexes[edge[1]]['uplinks'])
        allocated_port_indexes.update({edge_index: {'a_end_index': lowest_available_downlink, 'b_end_index': lowest_available_uplink}})
        free_port_indexes[edge[0]]['downlinks'].remove(lowest_available_downlink)
        free_port_indexes[edge[1]]['uplinks'].remove(lowest_available_uplink)
        edge_index += 1

    return allocated_port_indexes
Function: render_config
The render_config function uses a combination of the NetworkX graph data and Jinja2 templates to render configuration files for all nodes in our Clos network, it does this by first extracting node hostnames, management IPs and interface data from the NetworkX graph, storing them in a dict and then passing them to a Jinja2 template named equivalently to the vendor argument that the user specifies. Configuration files are then written to the configs/ folder.
Code
def render_config(self, router_list):
    '''
        Summary:
        Takes a list of router names and builds a vars_dict dict for each router in it to pass to the associated Jinja template for rendering.
        Iterates edges in the networkx graph object to extract edge attributes and add them into vars_dict.
        Template to render against is matched to self.vendor, provided as an arg at runtime.
        Configs are written to the configs/ folder named as hostname.conf.

        vars_dict contains:
            - hostname
            - mgmt_ip
            - interfaces: Dict of dicts, keyed by index, containing:
                - a_end_ip
                - a_end (hostname)
                - a_end_index
                - b_end_ip
                - b_end (hostname)
                - b_end_index

        vars_dict dict example:
        {
            'hostname': 's1-r1',
            'mgmt_ip': '172.16.0.0',
            'interfaces': {
                0: {'a_end_ip': '10.0.0.0', 'a_end': 's1-r1', 'a_end_index': 24, 'b_end_ip': '10.0.0.1', 'b_end': 't2-r1', 'b_end_index': 0},
                1: {'a_end_ip': '10.0.0.2', 'a_end': 's1-r1', 'a_end_index': 25, 'b_end_ip': '10.0.0.3', 'b_end': 't2-r2', 'b_end_index': 0},
                2: {'a_end_ip': '10.0.0.4', 'a_end': 's1-r1', 'a_end_index': 26, 'b_end_ip': '10.0.0.5', 'b_end': 't2-r3', 'b_end_index': 0},
                3: {'a_end_ip': '10.0.0.6', 'a_end': 's1-r1', 'a_end_index': 27, 'b_end_ip': '10.0.0.7', 'b_end': 't2-r4', 'b_end_index': 0},
                ...etc
            }
        }

        Takes:
        self: Clos object
        router_list: Name of router list to render configuration for
    '''
    for router in self.nodes[router_list]:
        vars_dict = {}
        vars_dict.update({'hostname': router, 'interfaces': {}})

        for node in self.G.nodes(data=True):
            if router == node[0]:
                vars_dict.update({'mgmt_ip': node[1]['mgmt_ip']})

        edge_index = 0
        for edge in self.G.edges(router, data=True):
            vars_dict['interfaces'].update({edge_index: edge[2]})
            edge_index += 1

        template_path = Environment(loader=FileSystemLoader('templates/'), trim_blocks=True, lstrip_blocks=True)
        template = template_path.get_template(self.vendor + '.j2')
        rendered_config = template.render(vars_dict)

        config_path = 'configs/' + self.vendor + '/' + router + '.conf'

        with open(config_path, 'w') as configuration:
            configuration.write(rendered_config)

        print(f'Rendered {config_path}')
Function: build
The build function is where all the magic happens, it’s responsible for building the NetworkX graph of nodes and edges, assigning management and point-to-point IPs, visualising the graph as a .png file and rendering the final configuration files.
First the 3 node lists (spine_list, tier2_list and tier1_list) are populated with hostnames based on the tier size arguments given by the user, then management IPs are created and assigned to nodes during creation in the NetworkX graph. Next we populate the edge list with edges from spine -> tier2 and tier2 -> tier1 as well as creating point-to-point IPs and calculating port indexes, after which we use the add_edge and set edge_attributes functions to create the edges in the NetworkX graph and assigned the IPs and port indexes to them as attributes. Now that our NetworkX graph is fully populated, we draw the graph and save it as a .png file for the user to visualise the Clos, after which the configuration for each node is finally rendered.
Code
def build(self):
    '''
        Summary:
        Builds the Clos object.
        Populates self.nodes and self.edges based on user provided args.
        Populates self.G.nodes and self.G.edges with self.nodes and self.edges.
        Nodes also include /32 IPs for management. Edges also include /31 IPs and port indexes.
        Topology is drawn and visualised with pygraphviz.
        Configuration is rendered with YAML and Jinja.

        Takes:
        self: Clos object

        Produces:
        Networkx graph object visualisation file.
        Full Clos network configuration.
    '''
    self.nodes['spine_list'] = ['s1-r' + str(node + 1) for node in range(int(self.spine_size))]
    self.nodes['tier2_list'] = ['t2-r' + str(node + 1) for node in range(int(self.tier2_size))]
    self.nodes['tier1_list'] = ['t1-r' + str(node + 1) for node in range(int(self.tier1_size))]

    mgmt_ips = self.get_mgmt_ips()

    node_index = 0
    for node_lists, nodes in self.nodes.items():
        for node in nodes:
            self.G.add_node(node)
            self.G.nodes[node]['mgmt_ip'] = str(mgmt_ips[node_index].hosts()[0])
            node_index +=1

    for spine_router in self.nodes['spine_list']:
        for tier2_router in self.nodes['tier2_list']:
            self.edges.append((spine_router, tier2_router))

    for tier2_router in self.nodes['tier2_list']:
        for tier1_router in self.nodes['tier1_list']:
            self.edges.append((tier2_router, tier1_router))

    p2p_ips = self.get_p2p_ips()
    port_indexes = self.get_port_indexes()

    edge_index = 0
    for edge in self.edges:
        self.G.add_edge(edge[0], edge[1])
        nx.set_edge_attributes(
            self.G,
            {
                (edge[0], edge[1]):
                {'a_end_ip': str(list(p2p_ips[edge_index].hosts())[0]),
                'a_end': edge[0],
                'a_end_index': port_indexes[edge_index]['a_end_index'],
                'b_end_ip': str(list(p2p_ips[edge_index].hosts())[1]),
                'b_end': edge[1],
                'b_end_index': port_indexes[edge_index]['b_end_index']}
            }
        )
        edge_index += 1

    print('Drawing topology...')
    vis = to_agraph(self.G)
    vis.layout('dot')
    vis.draw(self.image_name)
    print(f'Topology drawn, saved as: {self.image_name}')
    print(f'Rendered {self.total_nodes} Nodes and {len(self.edges)} Edges')

    self.render_config('spine_list')
    self.render_config('tier2_list')
    self.render_config('tier1_list')
Miscellaneous
argparse
Argparse takes the following arguments:
- ipr (IP range to extract /31 p2p IPs from)
- mgmtr (IP range to extract /32 management IPs from)
- spine (Spine size)
- tier2 (Tier2 size)
- tier1 (Tier1 size)
- vendor (vendor – junos|cisco)
parser = argparse.ArgumentParser(description='ClosX - Clos Network Generator')
parser.add_argument('-ipr', action="store", dest="ip_range")
parser.add_argument('-mgmtr', action="store", dest="mgmt_range")
parser.add_argument('-spine', action="store", dest="spine_size")
parser.add_argument('-tier2', action="store", dest="tier2_size")
parser.add_argument('-tier1', action="store", dest="tier1_size")
parser.add_argument('-vendor', action="store", dest="vendor")
args = parser.parse_args()
if __name__ == “__main__”
We create a Clos object by passing the arguments collected by argparse and then call the build() function.
if __name__ == "__main__":
    Clos = Clos(args.spine_size, args.tier2_size, args.tier1_size, args.ip_range, args.mgmt_range, args.vendor)
    Clos.build()
Examples
Usage
3 Tier Clos Network Generator
  Example usage:
  $ cd ClosX
  $ chmod +x closx
  $ ./closx -spine 8 -tier1 16 -tier2 16 -ipr 10.0.0.0/22 -mgmtr 172.16.0.0/24 -vendor junos
  $ ./closx -spine 8 -tier1 16 -tier2 16 -ipr 10.0.0.0/22 -mgmtr 172.16.0.0/24 -vendor cisco_ios

    -spine: size of spine
    -t2: size of tier 2
    -t1: size of tier 1
    -ipr: IP range to extract /31 p2p IPs from
    -mgmtr: IP range to extract /32 management IPs from
    -vendor: vendor template to render configuration against

  Currently supported vendor platforms:
    - Junos
    - Cisco IOS
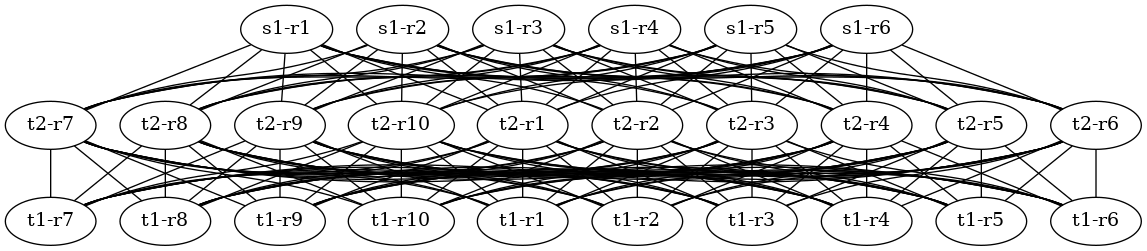
6 wide spine / 10 wide leaf
$ ./closx -spine 6 -tier1 10 -tier2 10 -ipr 10.0.0.0/22 -mgmtr 172.16.0.0/24 -vendor junos
8 wide spine / 16 wide leaf
$ ./closx -spine 8 -tier1 16 -tier2 16 -ipr 10.0.0.0/22 -mgmtr 172.16.0.0/24 -vendor junos

Thanks for reading!